
Questionnaires
Sent Questionnaires
Section titled “Sent Questionnaires”When a third party submits a questionnaire, its status changes to "Under Review" and your reviewers are emailed. Reviewers read the answers, comment on them, and then either accept the questionnaire as complete or send it back to the third party for changes. This page covers that review, and what the third party sees in its portal.
Accessing the questionnaires
Section titled “Accessing the questionnaires”All sent questionnaires are listed on the "Sent Questionnaires" tab, with their progress and status.
Navigation path
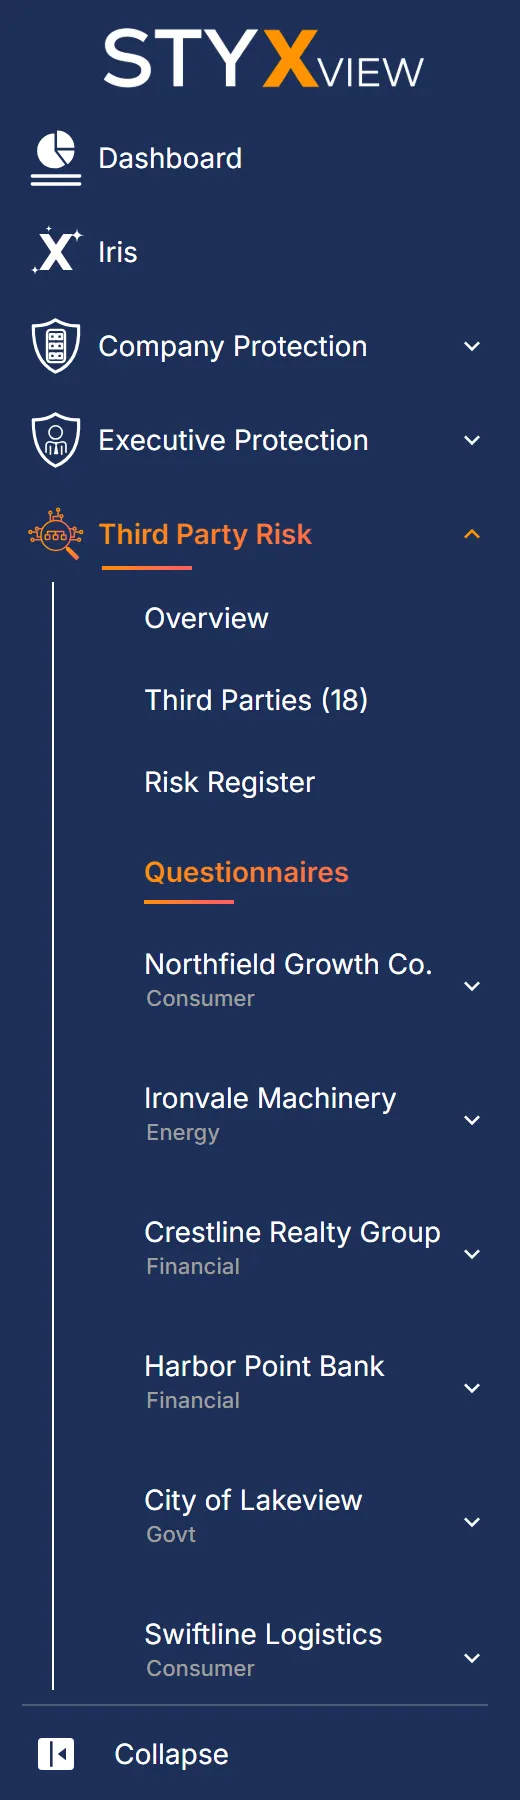
Section titled “Navigation path”- In the sidebar, select Third Party Risk → Questionnaires.
- On the "Sent Questionnaires" tab, select a questionnaire's row or its view icon.
Sending a questionnaire
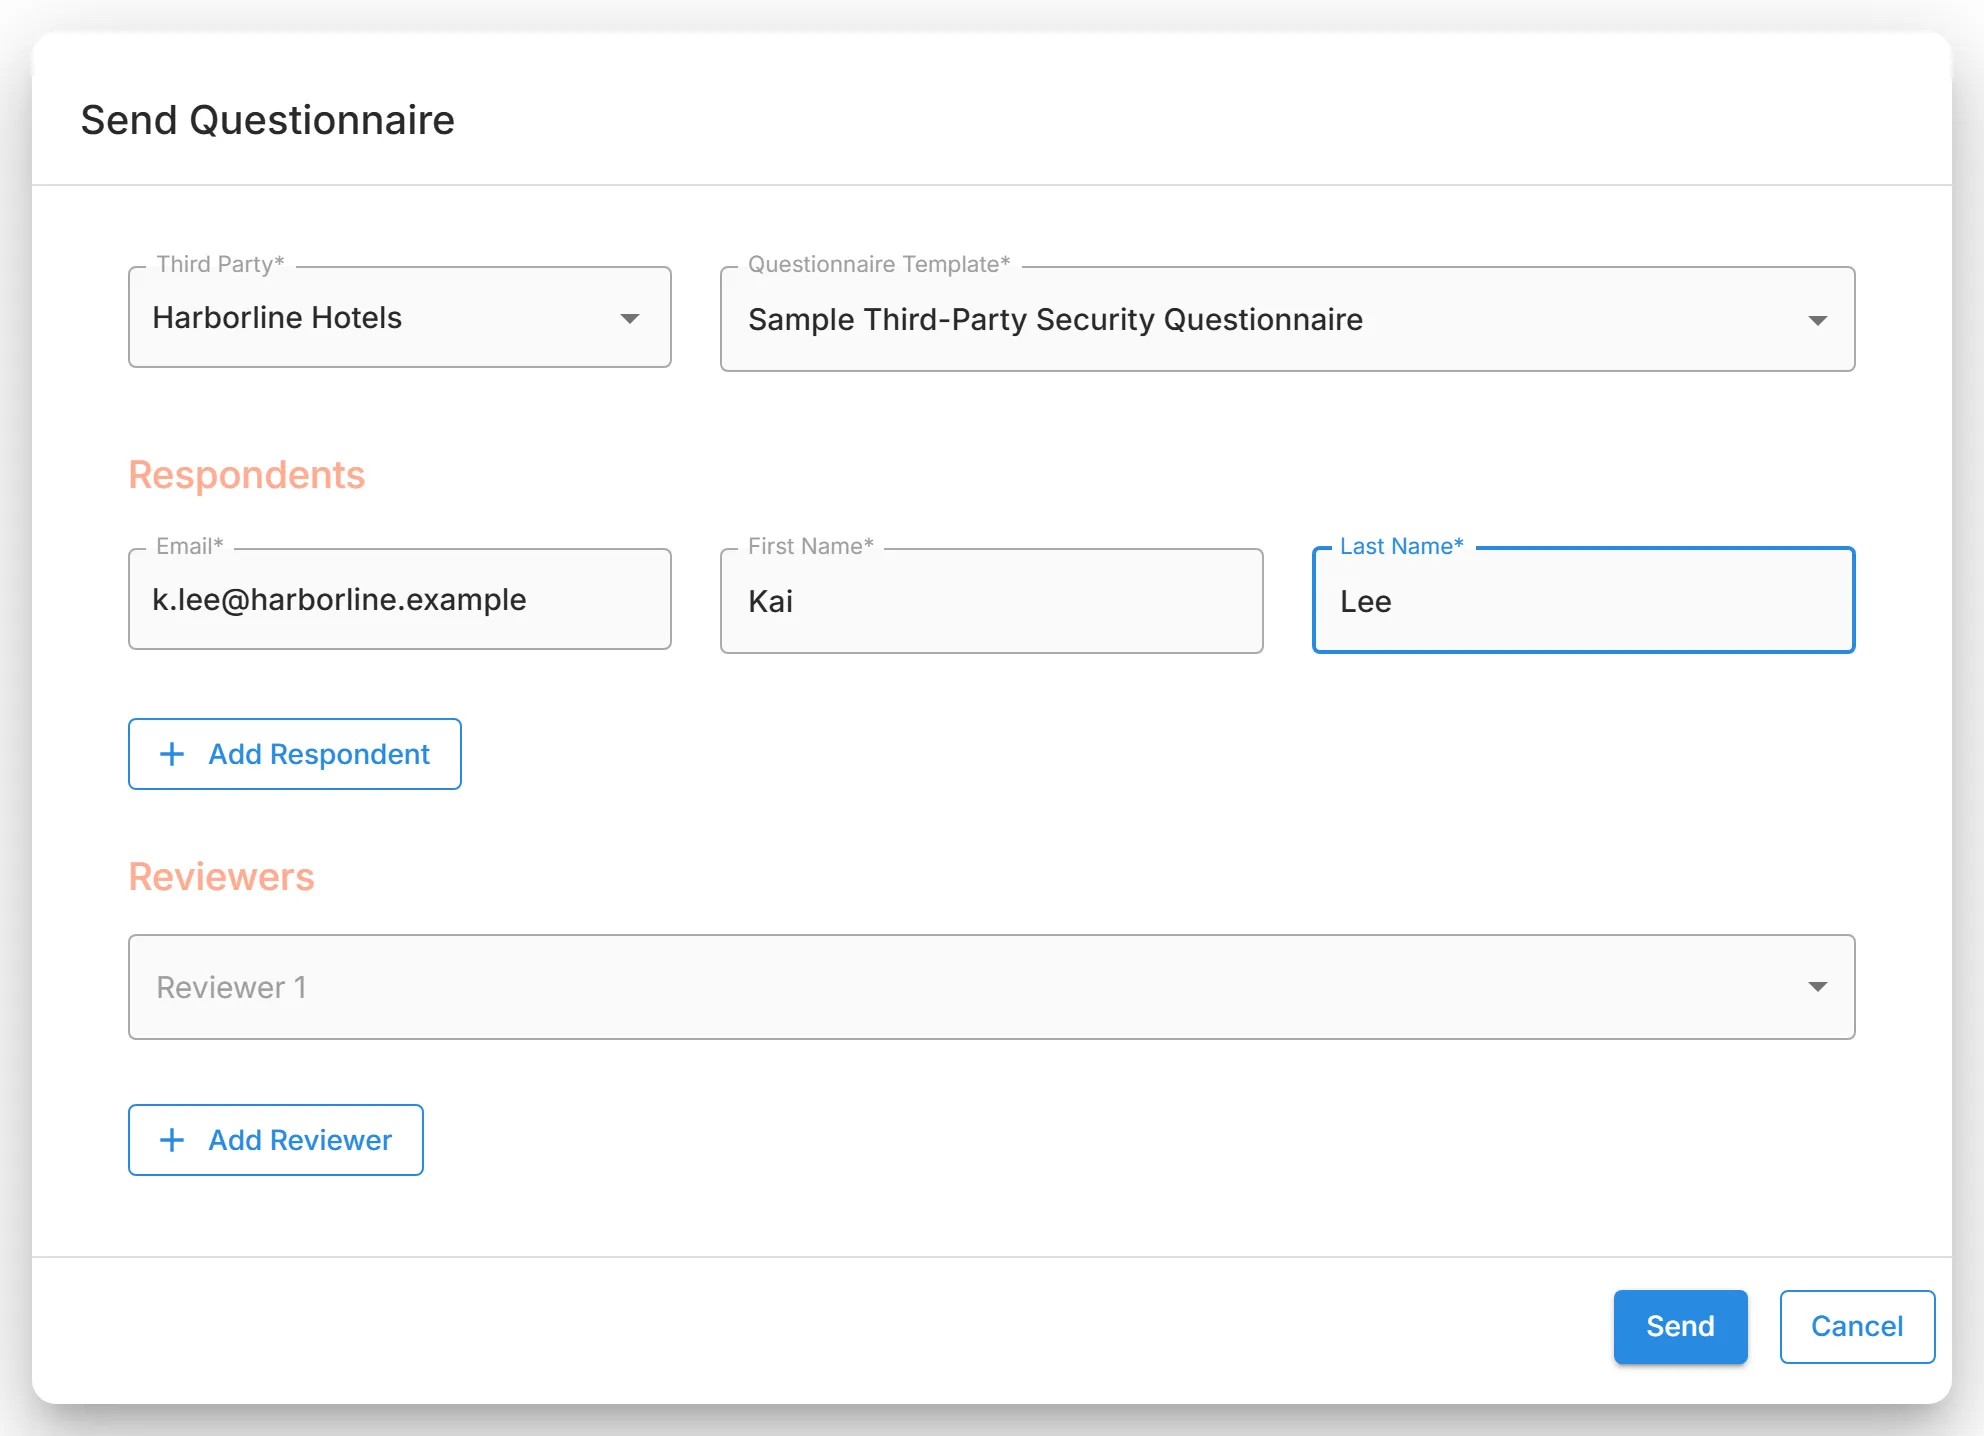
Section titled “Sending a questionnaire”You send a questionnaire with "Send Questionnaire", choosing the third party, the template, the respondents who answer it, and the reviewers who review it. For the full steps, see Sending a questionnaire.

Monitoring questionnaire status
Section titled “Monitoring questionnaire status”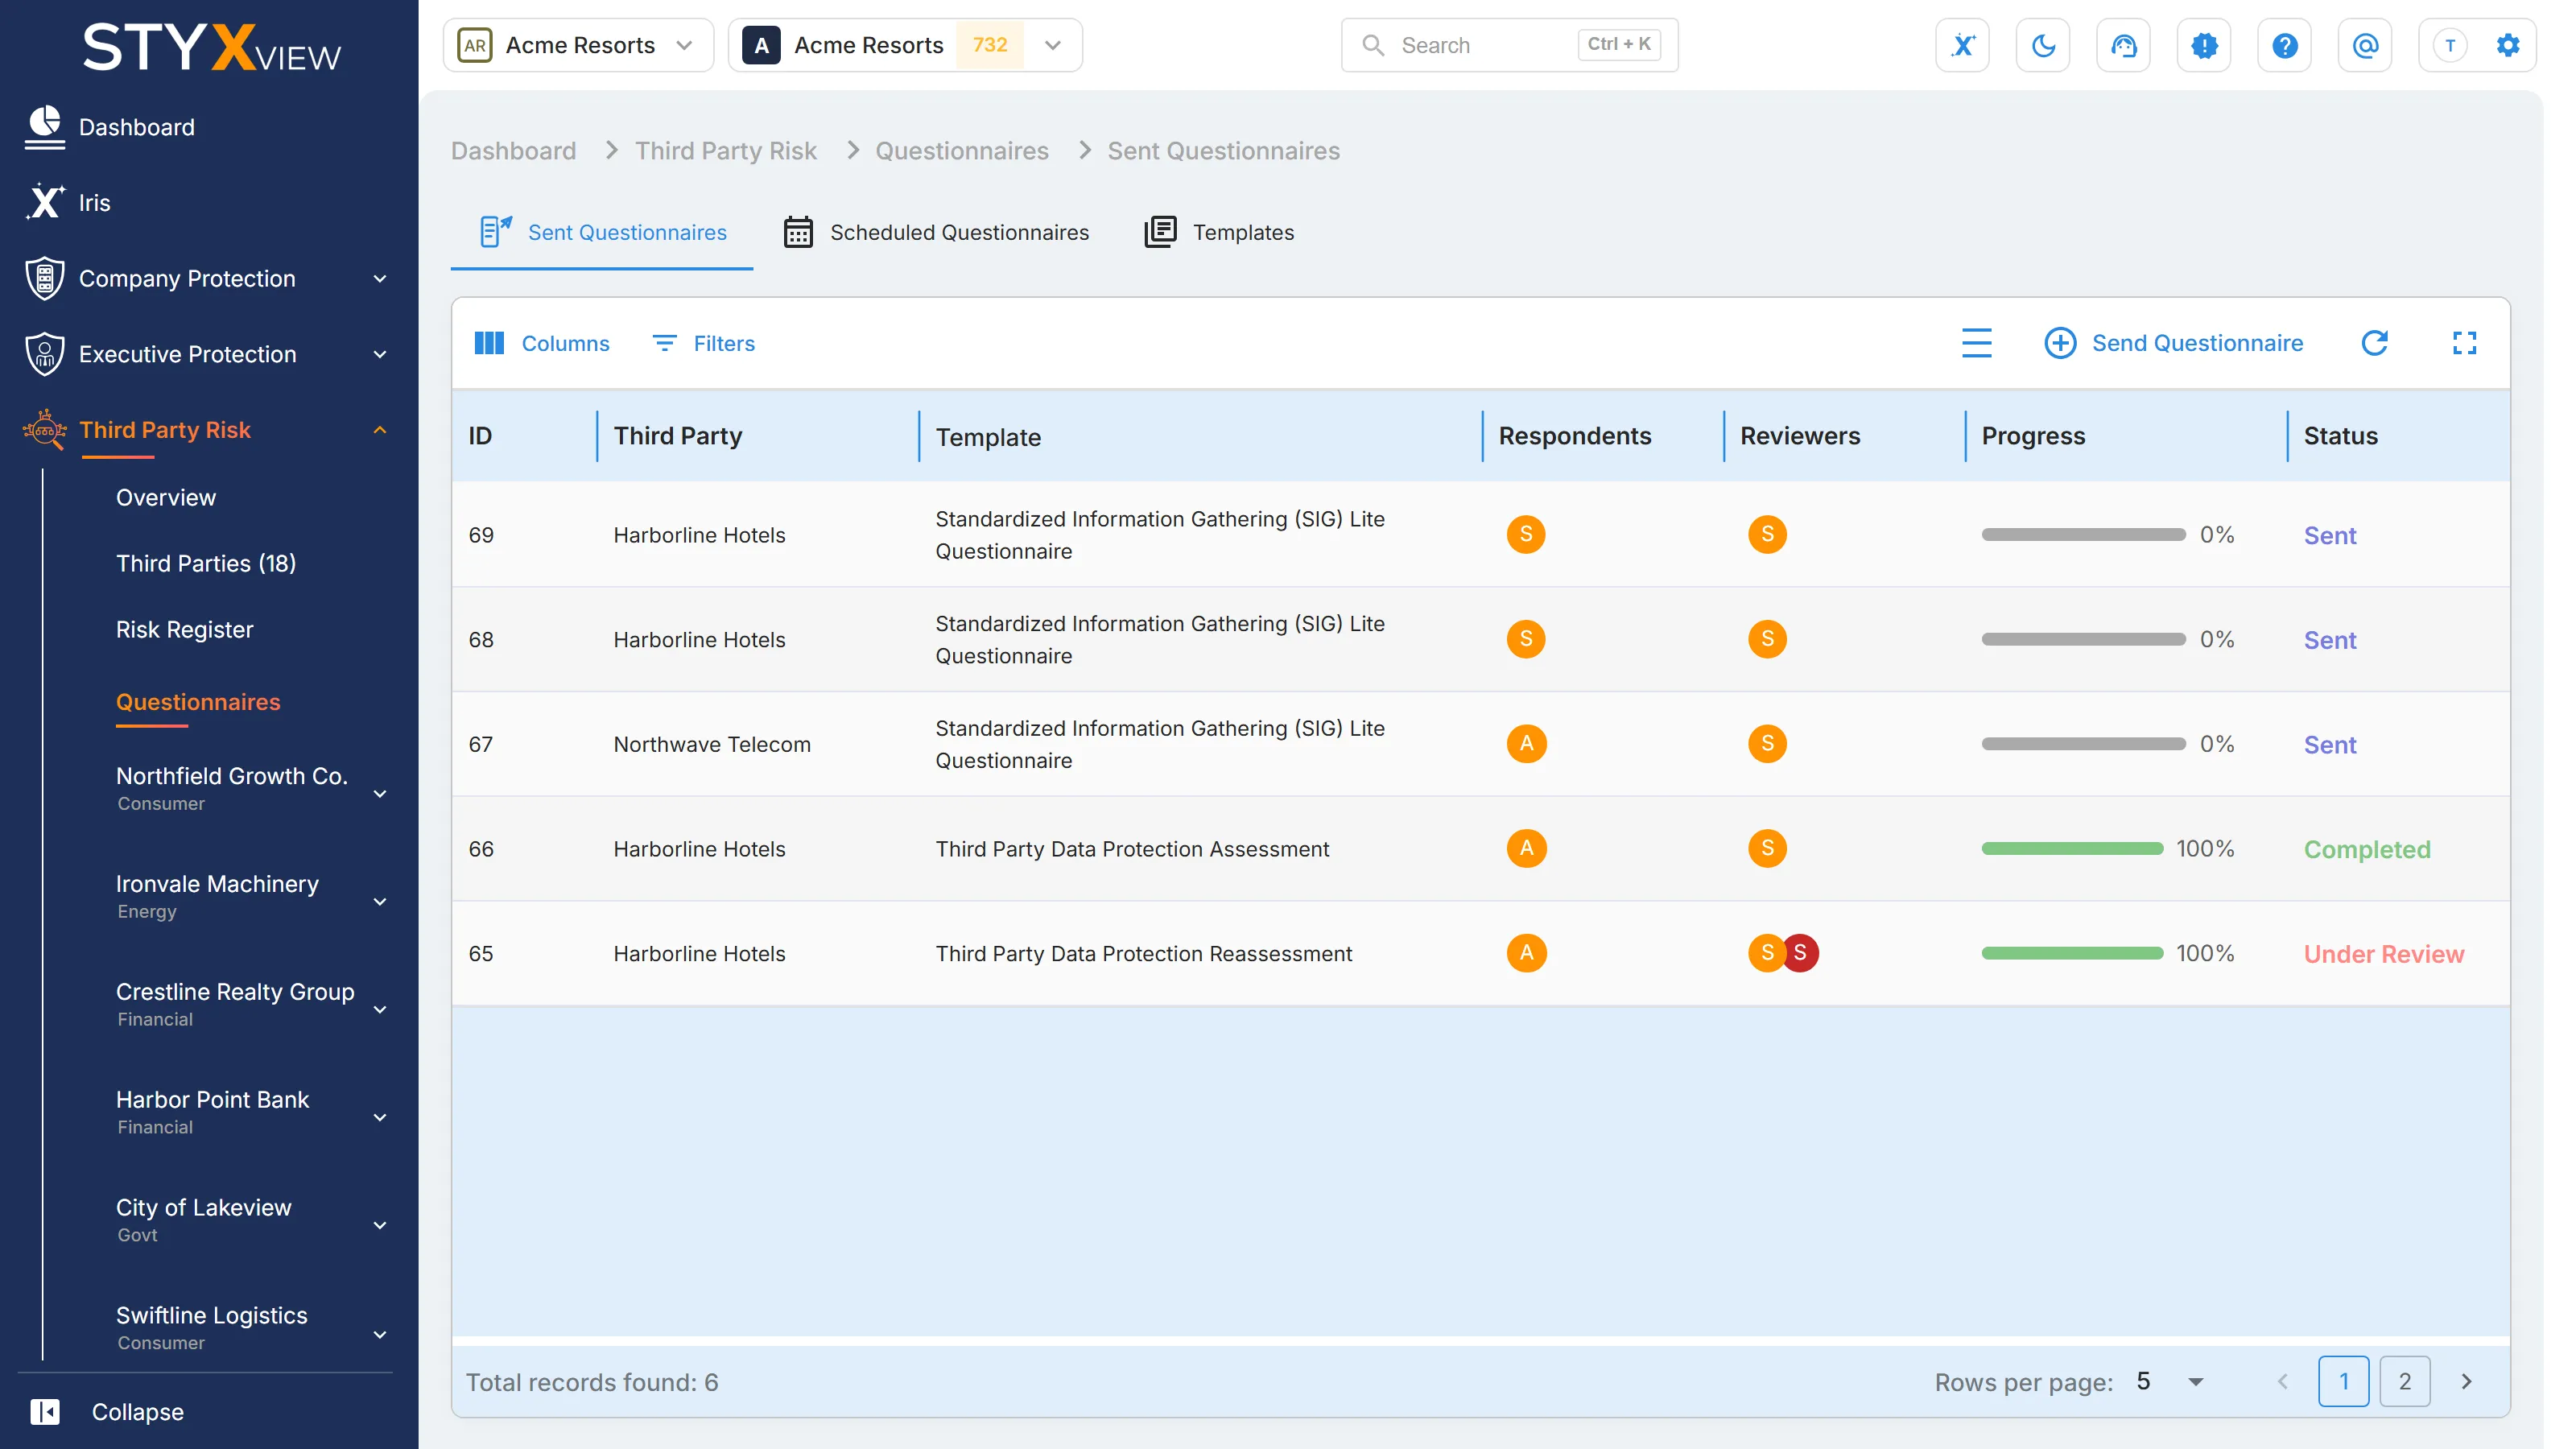
A questionnaire is ready for review when its "Status" is "Under Review". For every column and status, see Monitoring questionnaire status.
Reviewing third party responses
Section titled “Reviewing third party responses”Open the questionnaire. Its sections are shown one at a time. A bar above and below the answers shows the section's position, such as "Category 2 of 9", the section's name, and, for a scored questionnaire, the section's score.
Only the reviewers assigned to the questionnaire can give feedback, and only while it is "Under Review". Everyone else, and reviewers at any other status, see the questionnaire read-only and move between sections with "Previous" and "Next".
For each question, the response view shows:
- The third party's answer and any uploaded files. Select a file to download it.
- "Response by", the respondent who answered.
- "Comments", with the number of comments so far. Expand it to read them, each with its date and author.
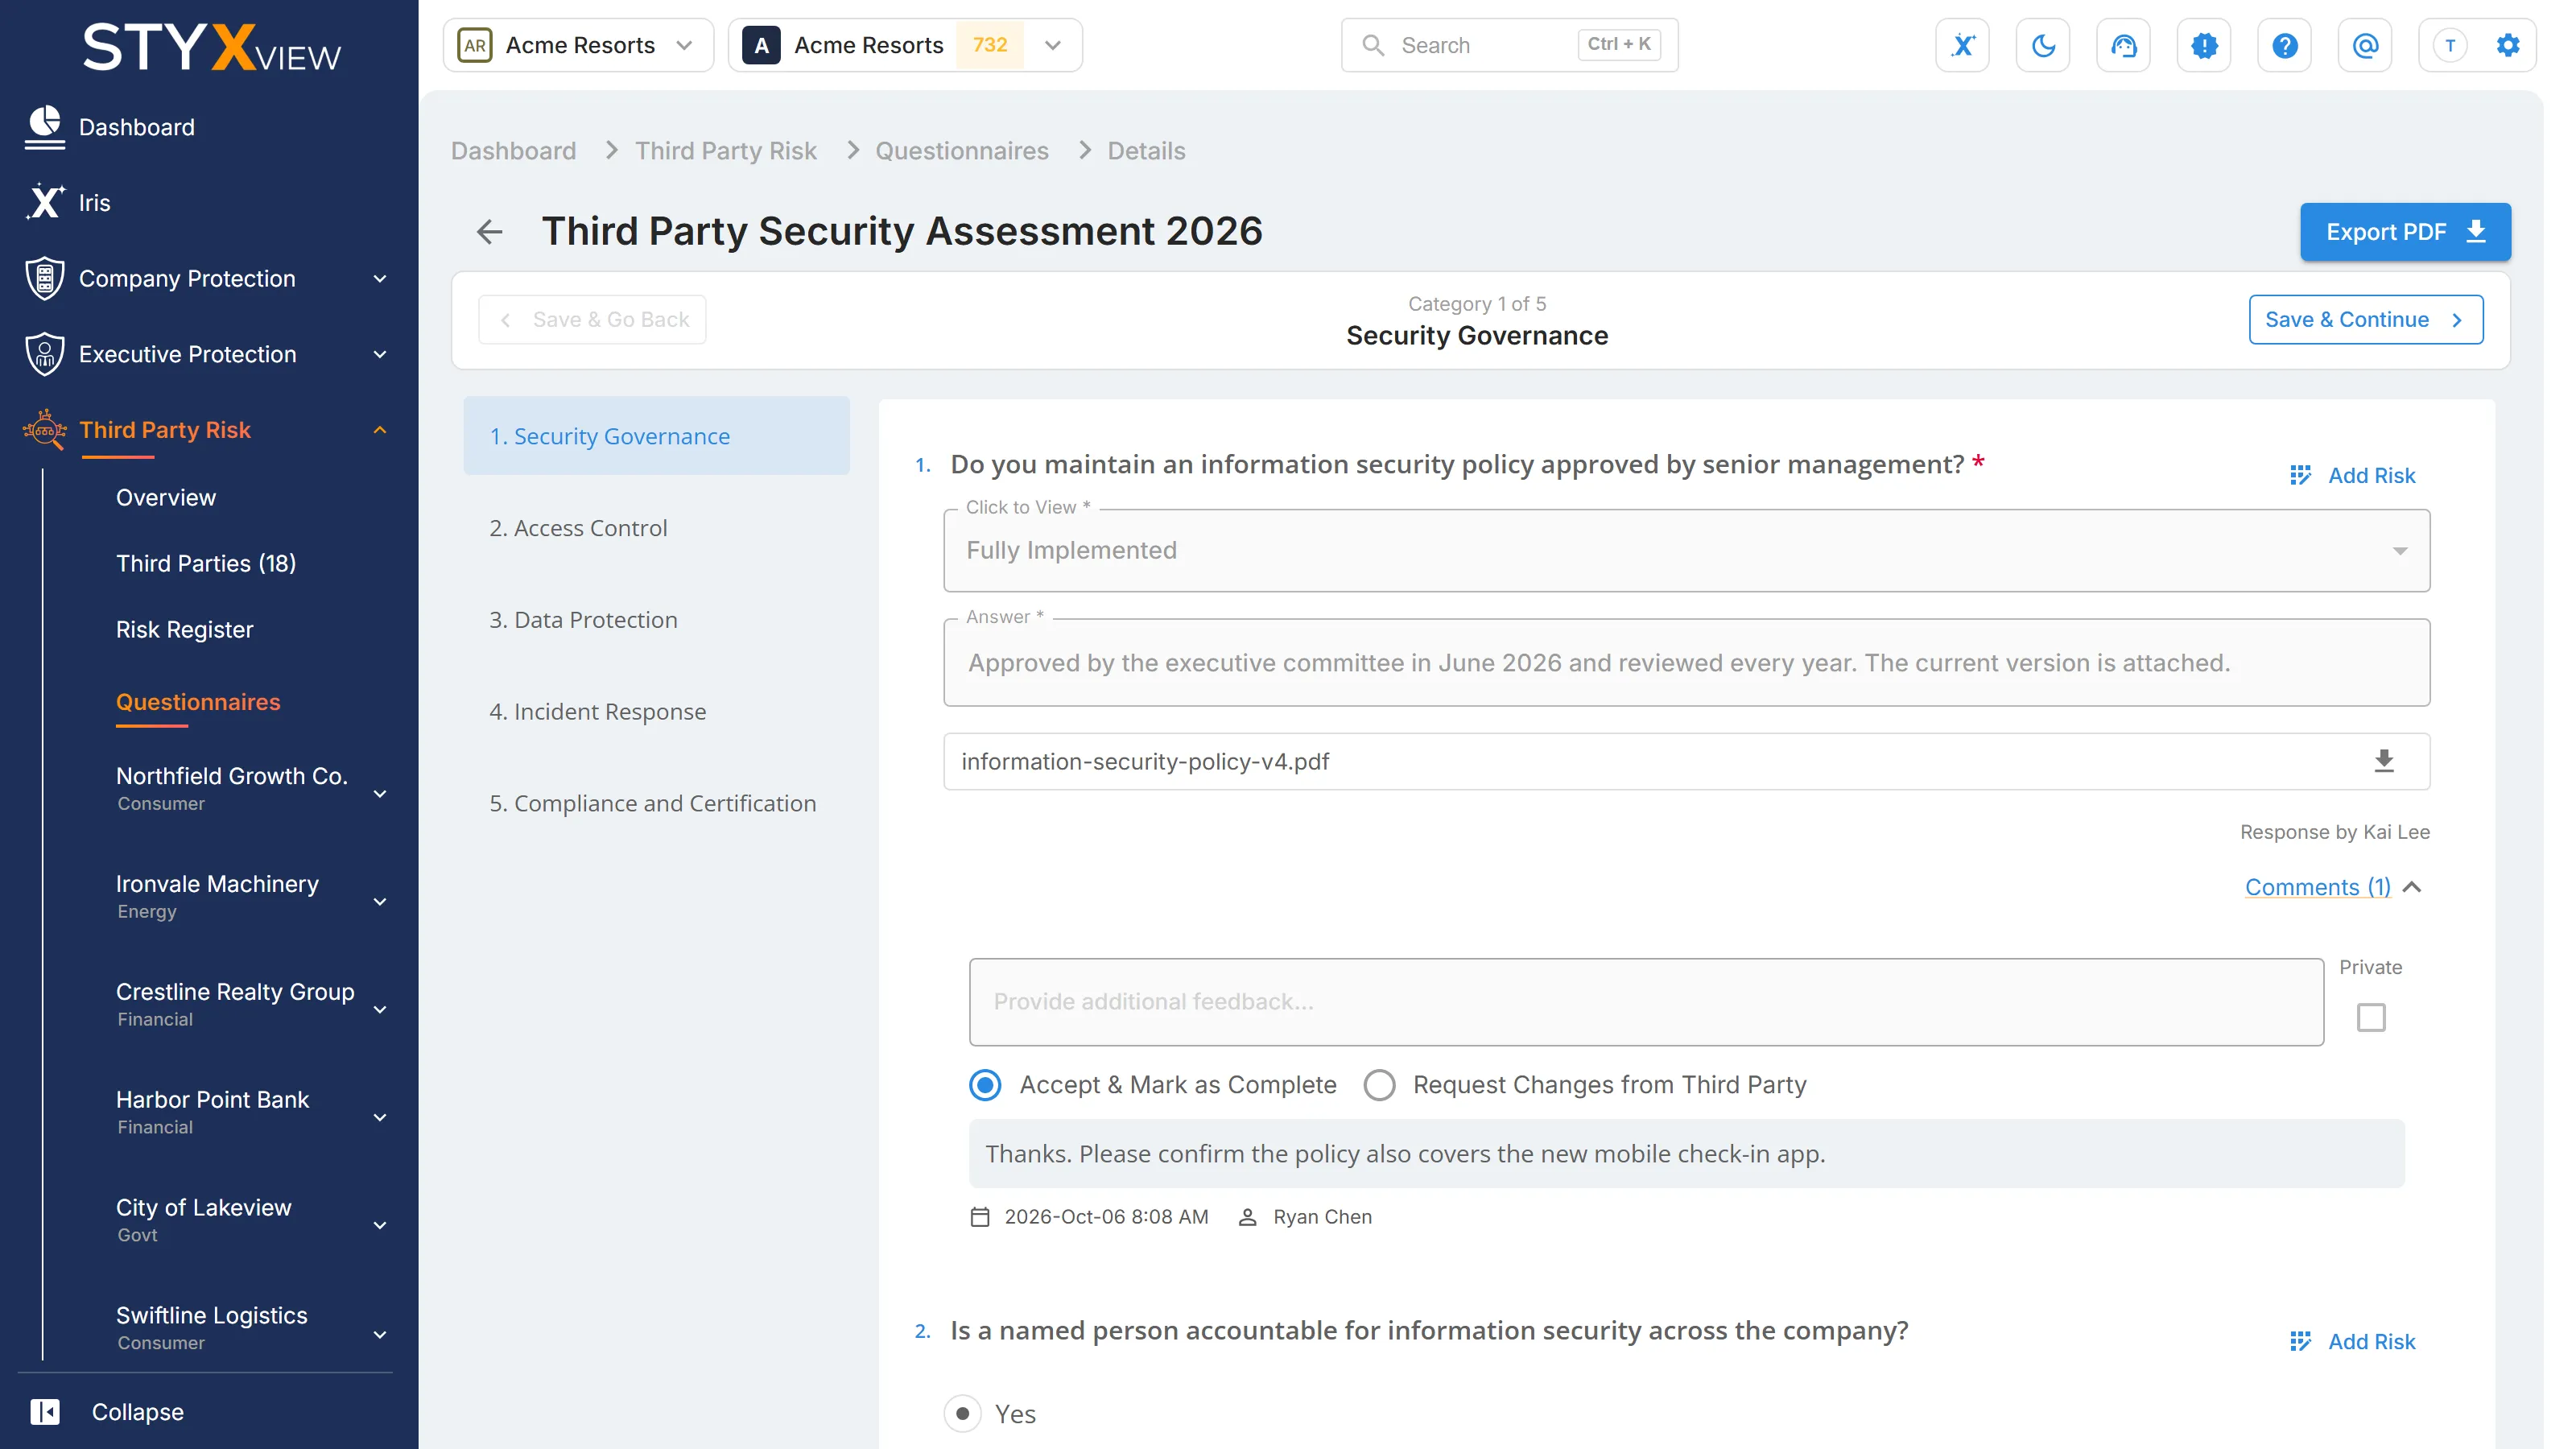
To give feedback on a question:
- Type your comment in "Provide additional feedback...".
- To keep the comment for your own team, select "Private". The third party does not see private comments.
- Choose "Accept & Mark as Complete" if the answer is acceptable, or "Request Changes from Third Party" if it needs work.
You can edit or delete your own comments while the questionnaire is "Under Review". Move between sections with "Save & Go Back" and "Save & Continue"; your feedback is saved as you go.
Reading the score
Section titled “Reading the score”If the questionnaire's template is scored, a "Questionnaire Risk Score" panel sits above the answers.

- The score runs from 0, fully compliant, to 1000, maximum risk. It uses the same scale and direction as the Digital Risk Score, so the two can be combined into the Combined Risk Score.
- "Provisional" means the score was calculated when the third party submitted. "Official" means it was recalculated when the questionnaire was completed. Only official scores feed the Combined Risk Score.
- The panel also gives the percentage of the weighted controls that are met, and a breakdown by section. Select "Show sub-section detail" to see each sub-section.
- Each scored question shows the credit its answer earned toward the question's weight. "N/A" means the answer excluded the question from scoring, and its weight was shared among the other questions.
- While the questionnaire is "Under Review" or "Completed", "Answer Set used" under a scored question's answers names the answer set and version that decided the credit.
For how scoring is configured, see Scoring a template.
Accepting or requesting changes
Section titled “Accepting or requesting changes”- On the last section, select "Finish". The "Finalize" step opens.
- Optionally, enter overall comments in "Provide your overall feedback...". If you are requesting changes, say what the third party needs to change.
- Choose "Request Changes from Third Party" or "Accept & Mark as Complete".
- Select "Submit", then "Yes" to confirm.
| Choice | Result |
|---|---|
| "Request Changes from Third Party" | The status changes to "Sent Back to TP". The respondents are emailed, and they can update their answers and submit again. |
| "Accept & Mark as Complete" | The status changes to "Completed". The respondents are emailed, and the questionnaire can no longer be changed. For a scored questionnaire, the score becomes official. |
A scored questionnaire cannot be completed if none of its scored answers can be credited, for example because every scored answer was excluded. StyxView shows an error instead.
When a questionnaire has overall feedback, the "Feedback" button at the top of the page shows it.
Raising a risk from an answer
Section titled “Raising a risk from an answer”Each question has an "Add Risk" button. Use it to record a risk in the Risk Register based on that answer. It is available once the third party has submitted: when the status is "Under Review", "Sent Back to TP", or "Completed". The risk's source is set to "Questionnaire" and linked to the question.
A warning icon beside "Add Risk" shows how many risks were already raised from the question. Select it to open those risks.
Exporting responses
Section titled “Exporting responses”Select "Export PDF" at the top of the page to download the questionnaire with its answers, for offline review or your records.
What the third party sees
Section titled “What the third party sees”Respondents work in the third party portal, separate from StyxView. This section summarises what they do, so you can support them.
Email notification and portal access
Section titled “Email notification and portal access”Each respondent receives an invitation email. A respondent who is new to the portal also receives a username and temporary password.
Login process
Section titled “Login process”-
The respondent selects "Sign In" in the email to open the portal.
-
They sign in with the credentials from the email.
-
At first sign-in, they set a new password.
Forgot password process
Section titled “Forgot password process”-
On the sign-in page, the respondent selects "Forgot Password?".
-
They enter their email address and select "Confirm and proceed".
-
They enter the verification code sent to their email, set a new password, and select "Confirm and proceed".
How the third party fills out the questionnaire
Section titled “How the third party fills out the questionnaire”-
After signing in, the respondent sees the questionnaires assigned to them, with their progress and status.
-
They open a questionnaire. The "Getting Started" page explains how to answer: required questions are marked with an asterisk, and supporting files can be attached with the paperclip icon. Each file can be up to 2 MB, in one of these formats: .pdf, .doc, .docx, .xls, .xlsx, .ppt, .pptx, .txt, .jpg, .jpeg, or .png.
-
They select "Start" and answer the questions, one section at a time.
Answering questions
Section titled “Answering questions”-
They type answers in the answer fields.
-
They attach supporting documents where a question allows it.
-
They select "Save & Go Back" or "Save & Continue" to save their progress and move between sections. They can stop and return later.
-
On the last section, they select "Review Answers", then "Submit", and confirm in "Send your responses?". The questionnaire's status in StyxView changes to "Under Review".
If you request changes, the questionnaire shows as "Needs Your Attention" in the portal. The respondent sees your feedback, selects "Update My Answers", and submits again.
Scheduled Questionnaires
Section titled “Scheduled Questionnaires”This tab is described in Sending Out a Questionnaire → Scheduling a questionnaire.
Templates
Section titled “Templates”The "Templates" tab lists every questionnaire template your team can work with: the system templates you have enabled from the TPRM Questionnaire Library, and the templates your team has built. Only enabled templates can be sent to a third party.
Navigation path
Section titled “Navigation path”- In the sidebar, select Third Party Risk → Questionnaires.
- Select the "Templates" tab.
Key features
Section titled “Key features”Templates table
Section titled “Templates table”The table lists each template with these columns:
| Column | What it shows |
|---|---|
| "Template" | The template's name. |
| "Type" | "System" for a template from the TPRM Questionnaire Library, or "User-Created" for one your team built or duplicated. |
| "Scoring" | "Yes" if the template has a scoring configuration, otherwise "No". |
| "Created At" | The date the template was created. |
| "Enabled" | Whether the template is offered in "Questionnaire Template" when you send a questionnaire. |
| "Actions" | The icons described below. |
The newest templates are listed first. Deleted templates are hidden. To see them, set the "Deleted Templates" filter to "Shown".
System templates
Section titled “System templates”A system template appears on this tab while it is enabled in the TPRM Questionnaire Library. Enable or disable it there; its "Enabled" checkbox on this tab cannot be changed. System templates cannot be edited, scored, or deleted. To customise one, duplicate it and work on the copy.
Create Template
Section titled “Create Template”Select "Create Template" to build a new questionnaire in the form builder. See Addition of Third Party Questionnaire.

Template actions
Section titled “Template actions”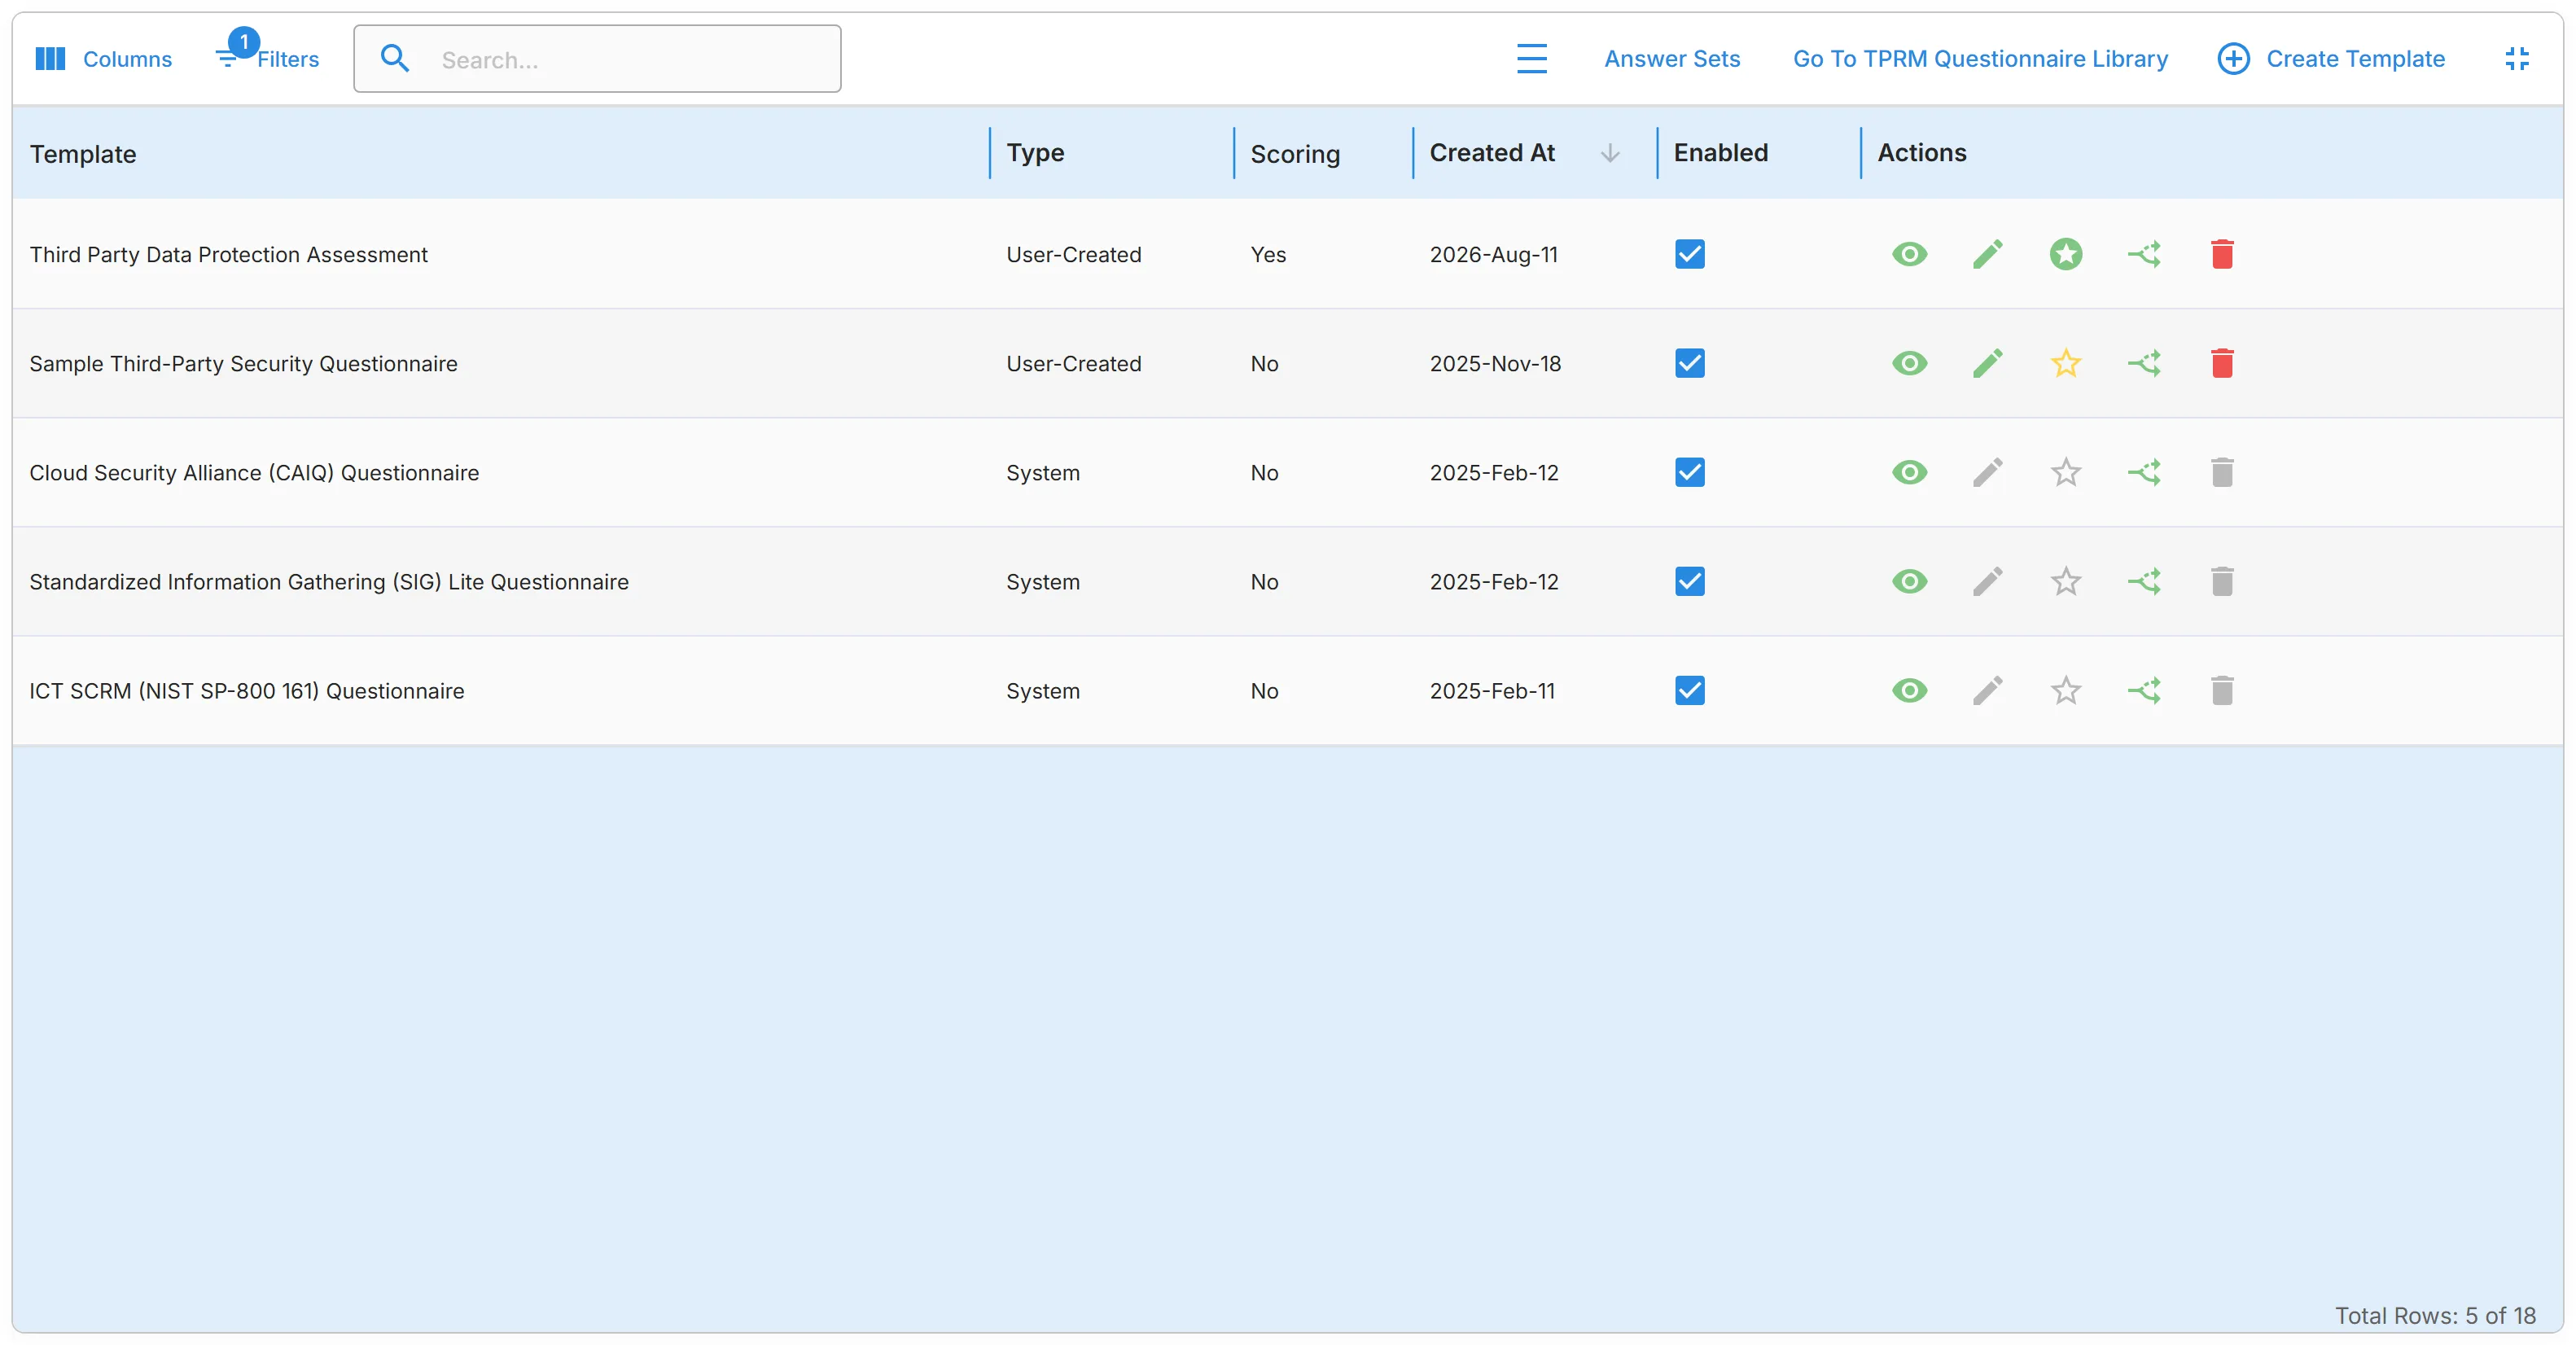
Enable template (checkbox)
Section titled “Enable template (checkbox)”Select the "Enabled" checkbox to make a user-created template available for sending. Clear it to stop offering the template. A new or duplicated template starts disabled.
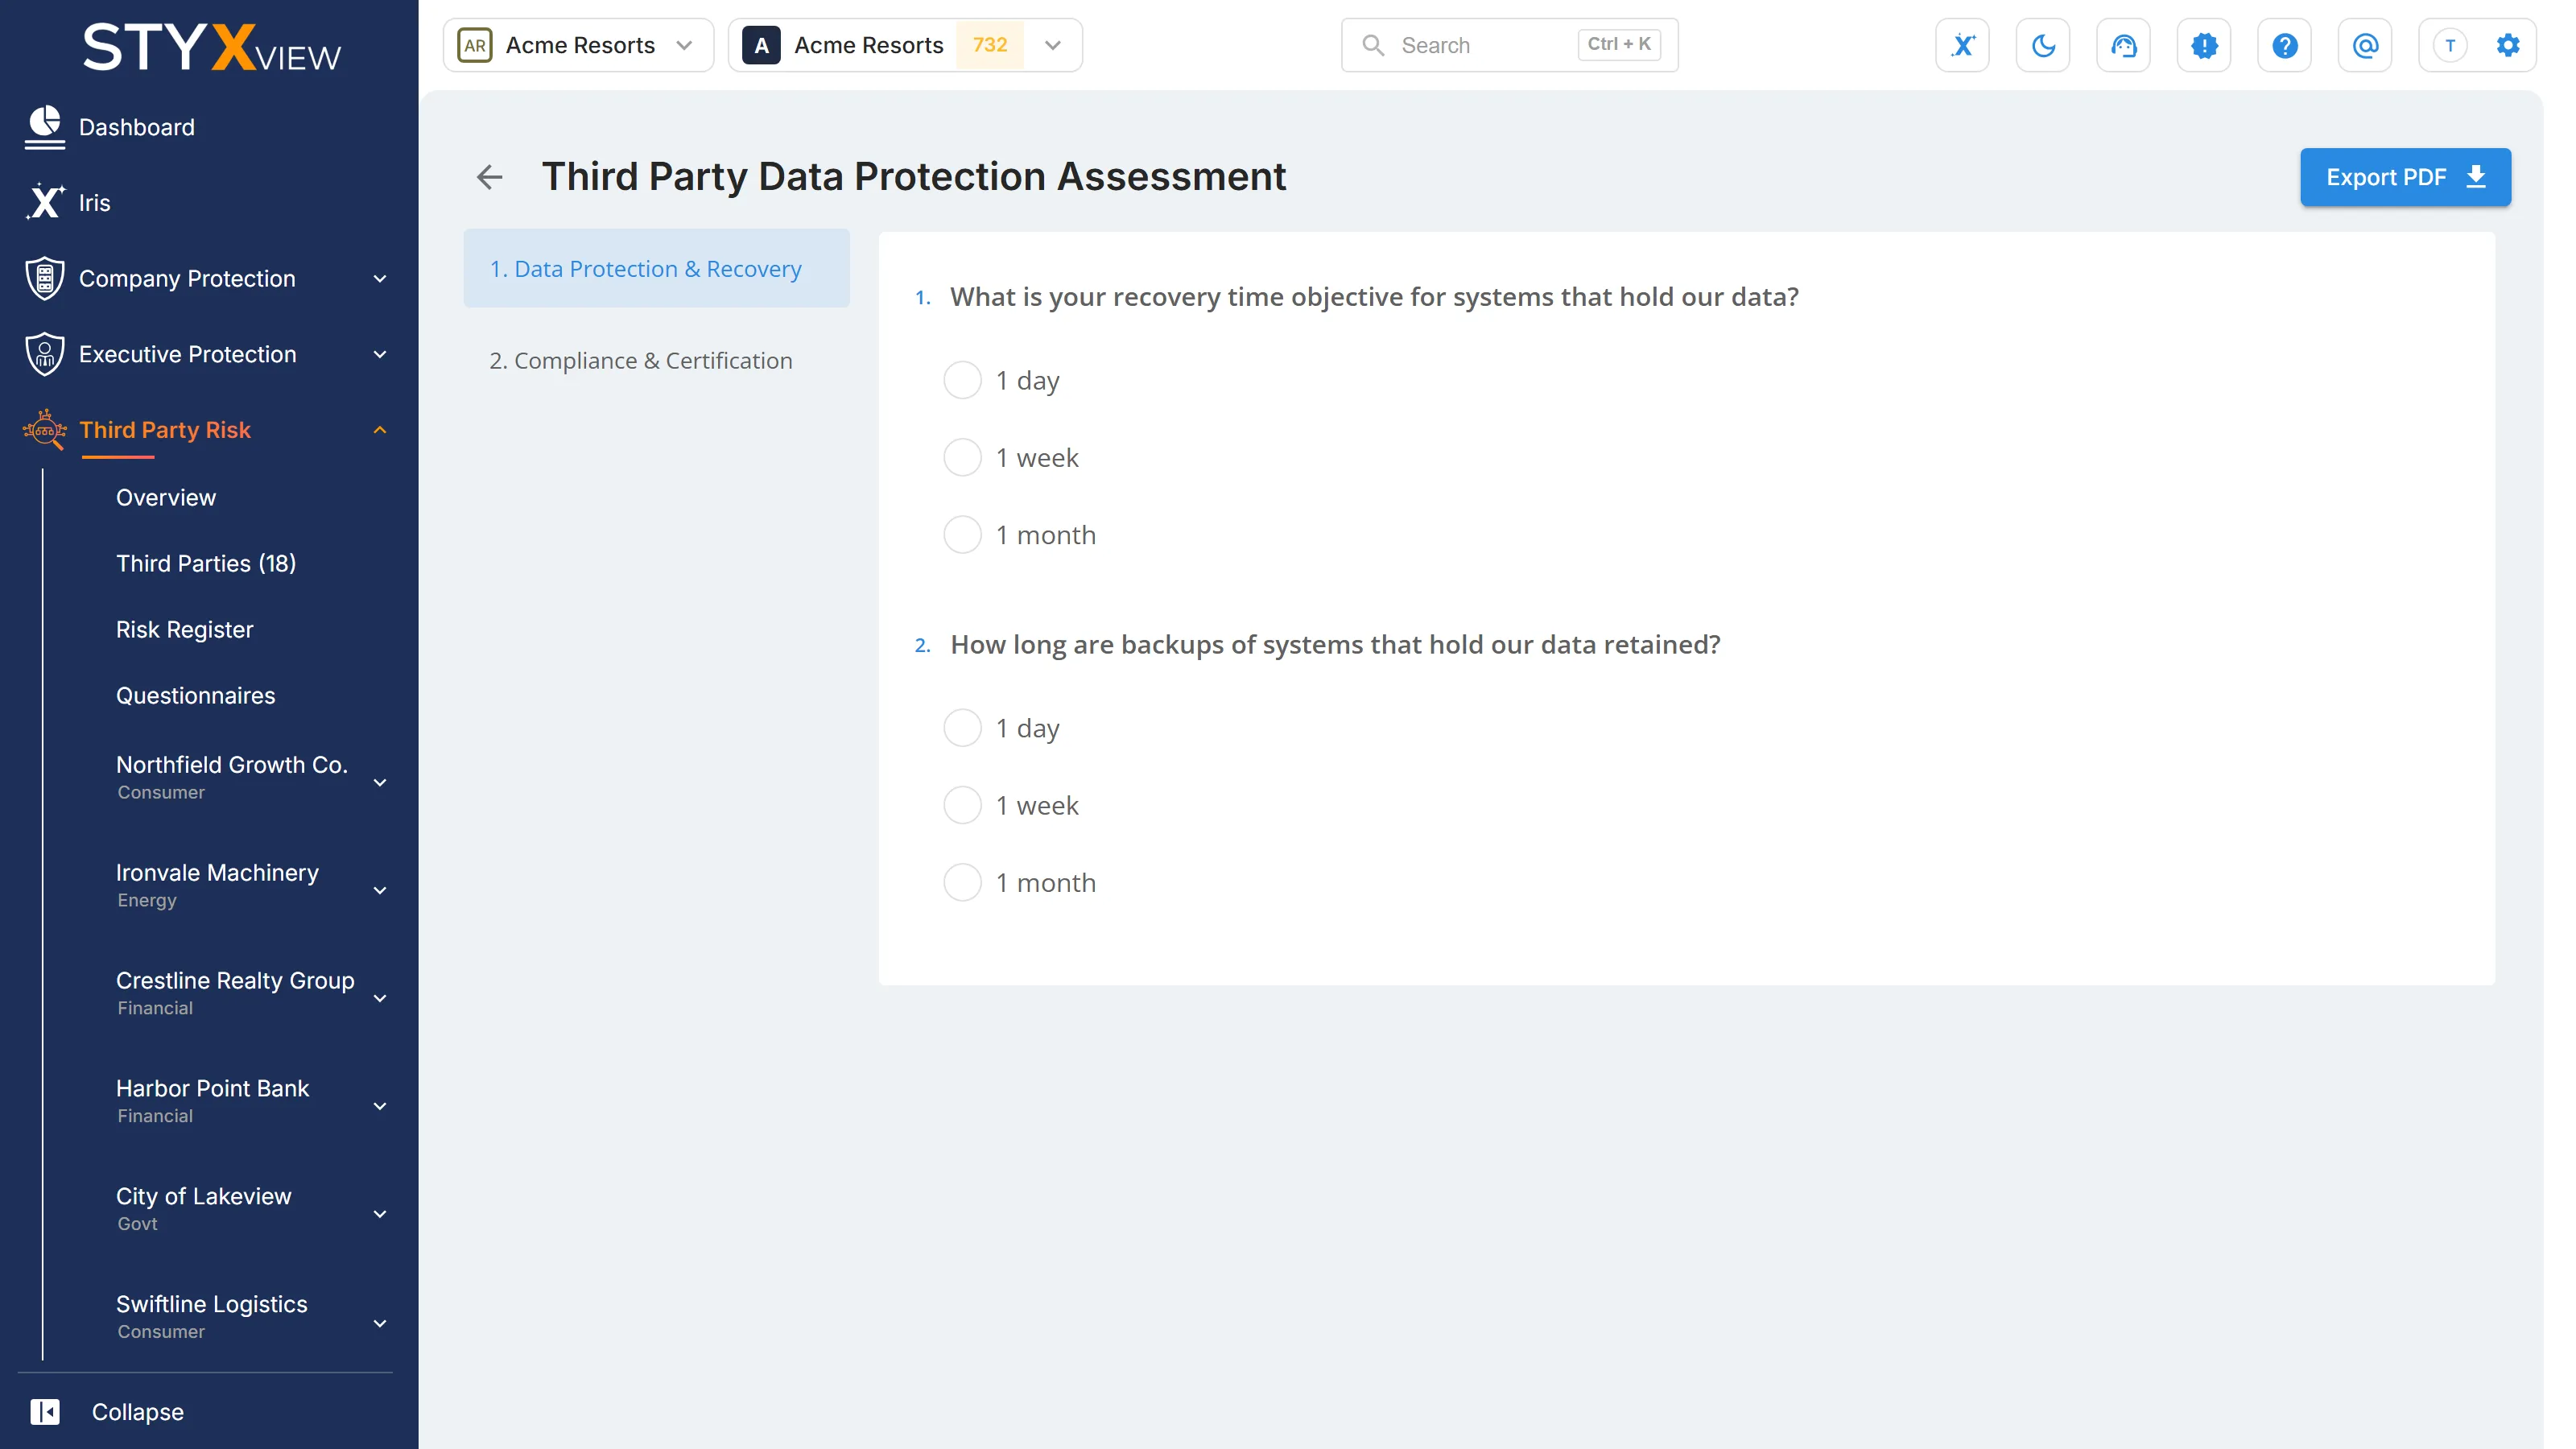
View (eye icon)
Section titled “View (eye icon)”"View Template" opens the whole template. Select "Export PDF" there to download it.
Edit (pencil icon)
Section titled “Edit (pencil icon)”"Edit Template" opens the template in the form builder. Available for user-created templates only.
Template Scoring (star icon)
Section titled “Template Scoring (star icon)”"Template Scoring" opens the template's "Scoring" tab in the form builder, where you choose which questions count toward the score and how much each is worth. A filled star means scoring is configured. Available for user-created templates only. See Scoring a template.
Duplicate (branch icon)
Section titled “Duplicate (branch icon)”"Duplicate Template" creates a user-created copy named after the original with " - Copy" added. Use it to customise a system template, or to build a new template from an existing one.
Delete (trash bin icon)
Section titled “Delete (trash bin icon)”"Delete Template" removes the template from use after you confirm. Questionnaires already sent with it can still be read. Available for user-created templates only.
Answer sets
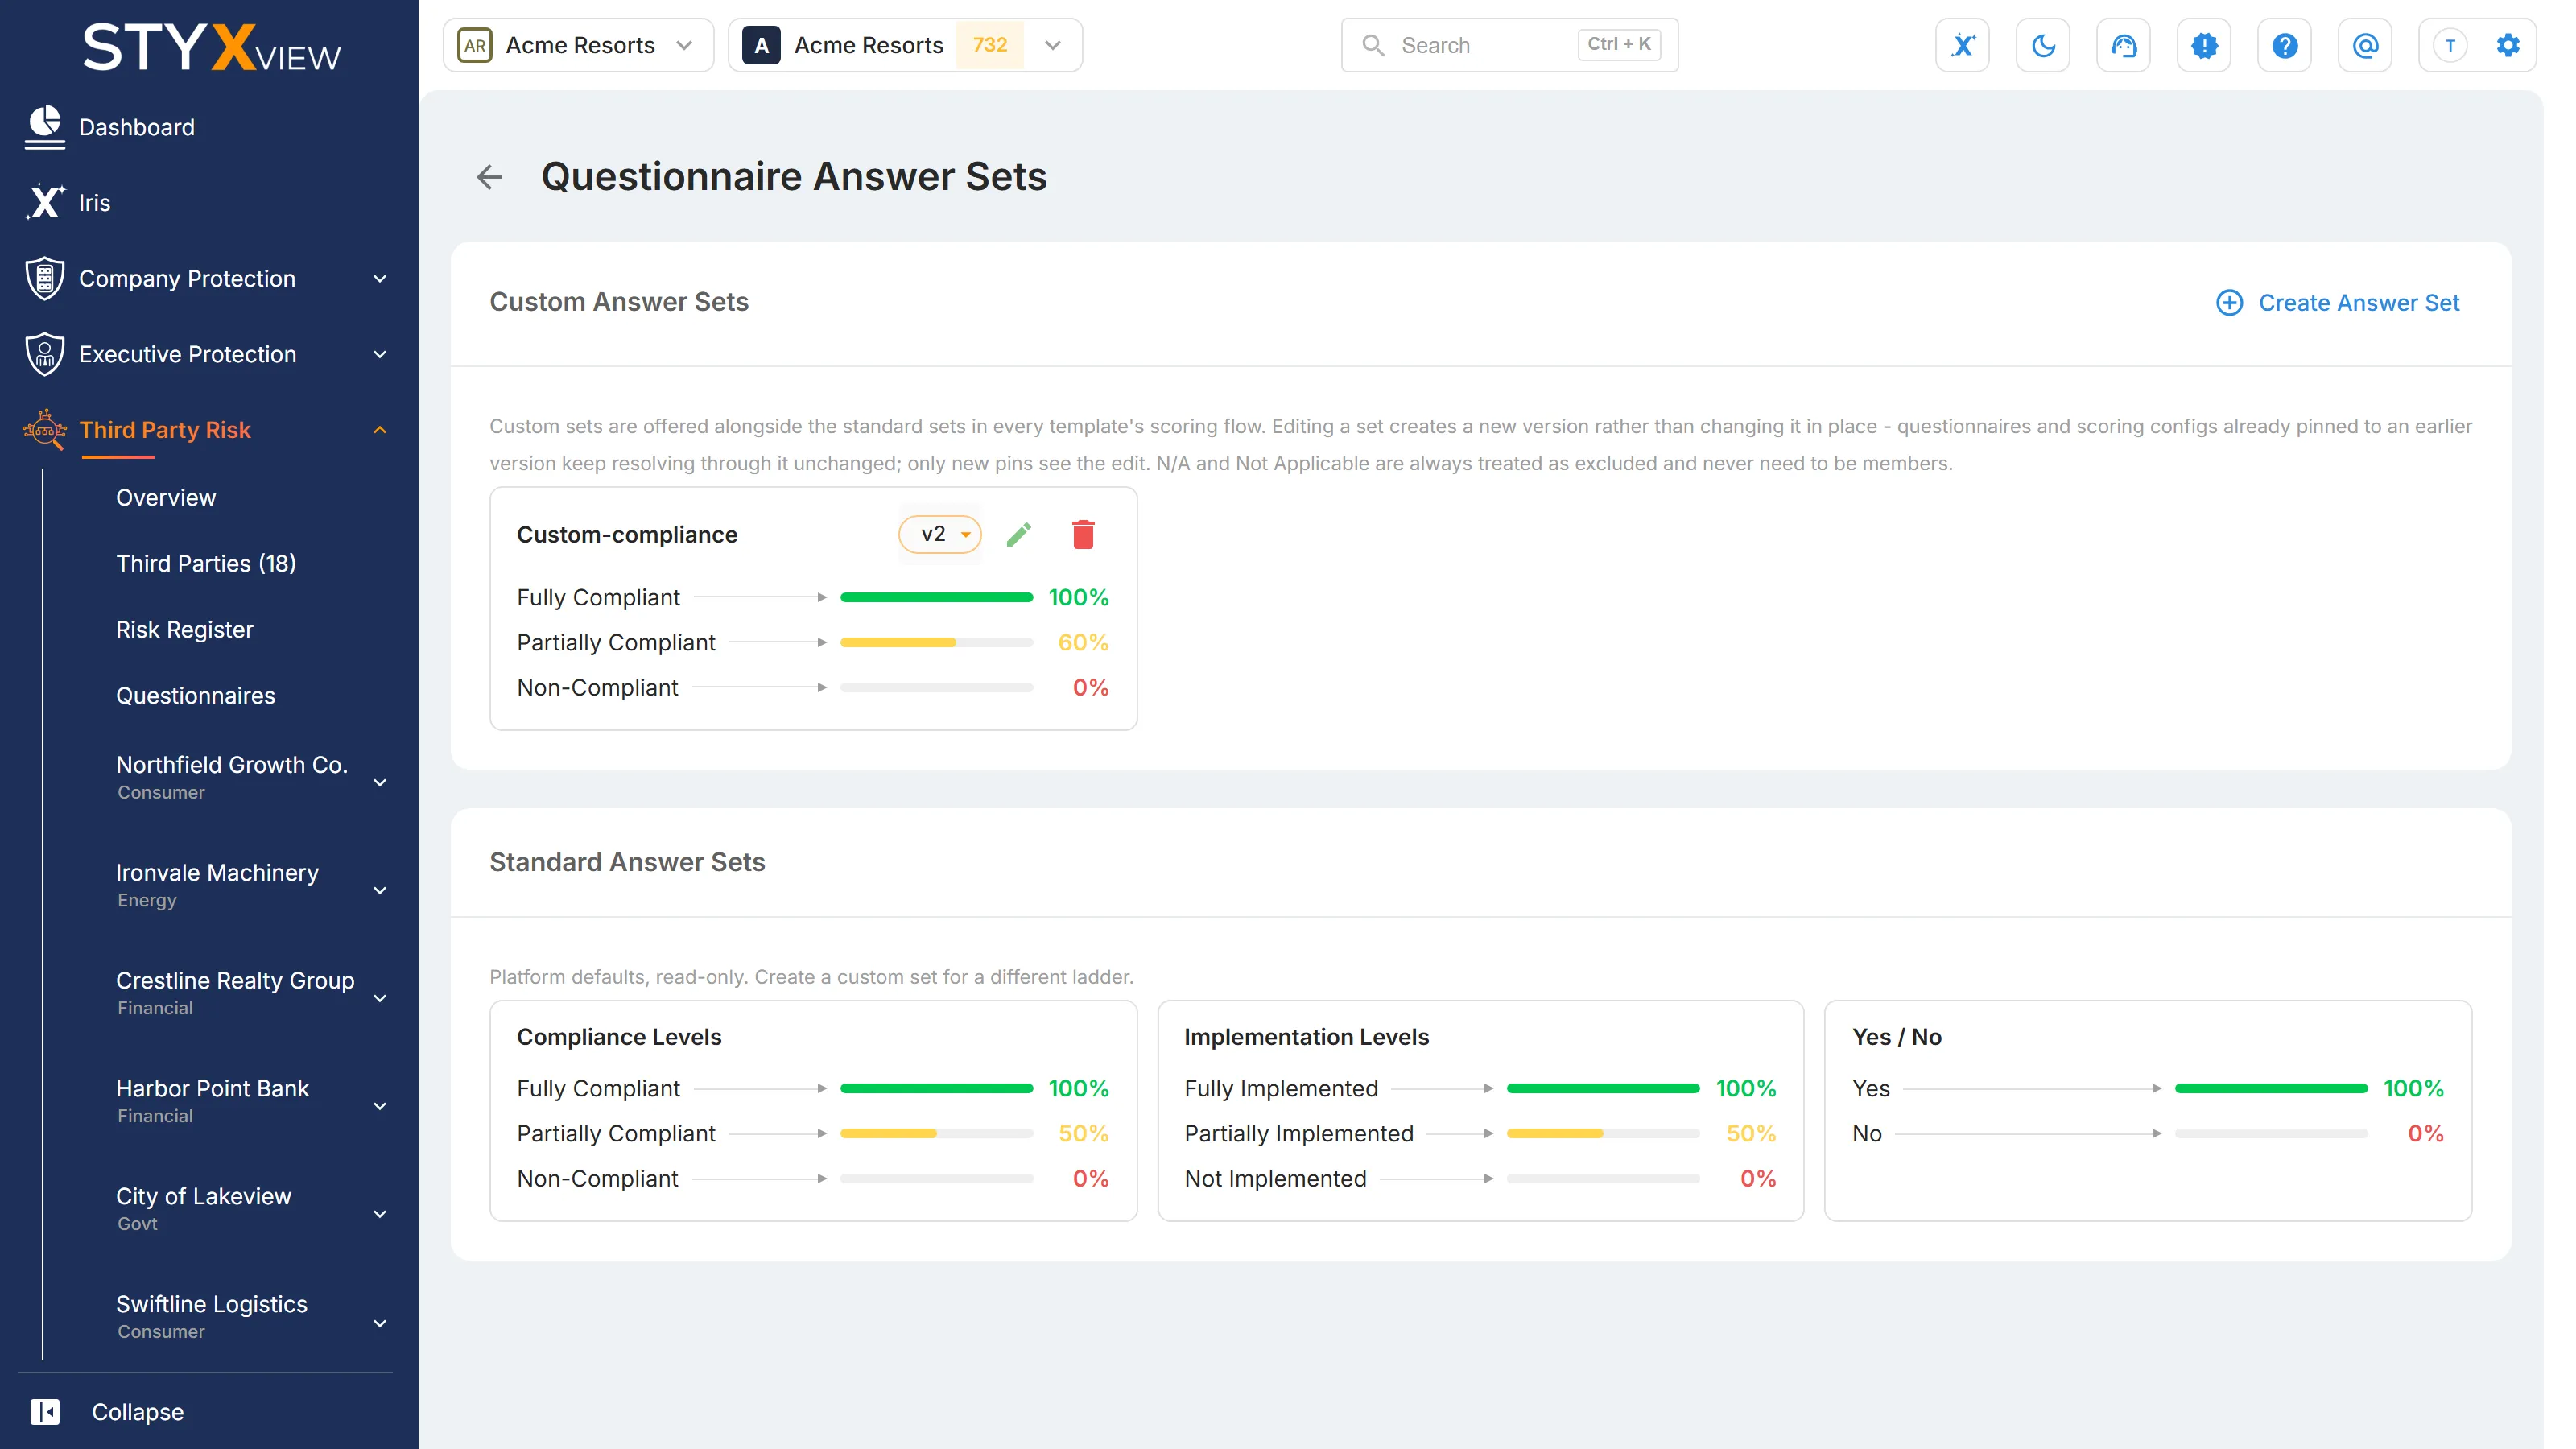
Section titled “Answer sets”Select "Answer Sets" above the table to open "Questionnaire Answer Sets". An answer set is a list of answers, each with the credit it earns toward a question's weight when a template is scored. For example, an answer can earn 100% of the weight, 50%, or nothing.
-
"Standard Answer Sets" are provided by StyxView and are read-only.
-
"Custom Answer Sets" are your own. Select "Create Answer Set", enter a "Set Name", and add each answer with "Add Answer". Give every answer a "Credit (%)" from 0 to 100, or select "Excluded" to drop the question from scoring when that answer is chosen. Select "Save".
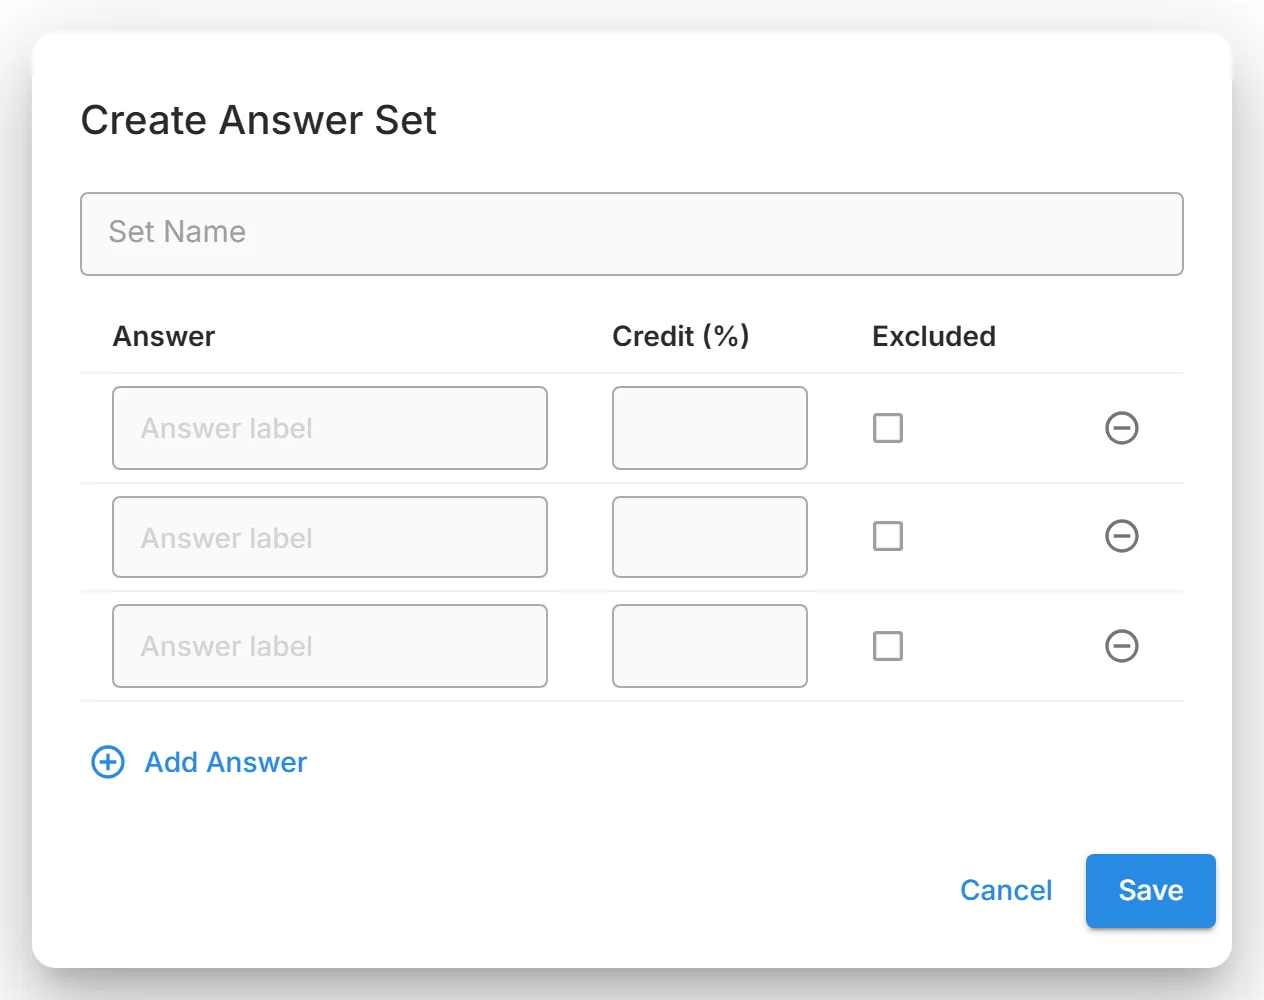
Editing an answer set saves a new version. Templates and questionnaires that already use an earlier version keep scoring against that version.
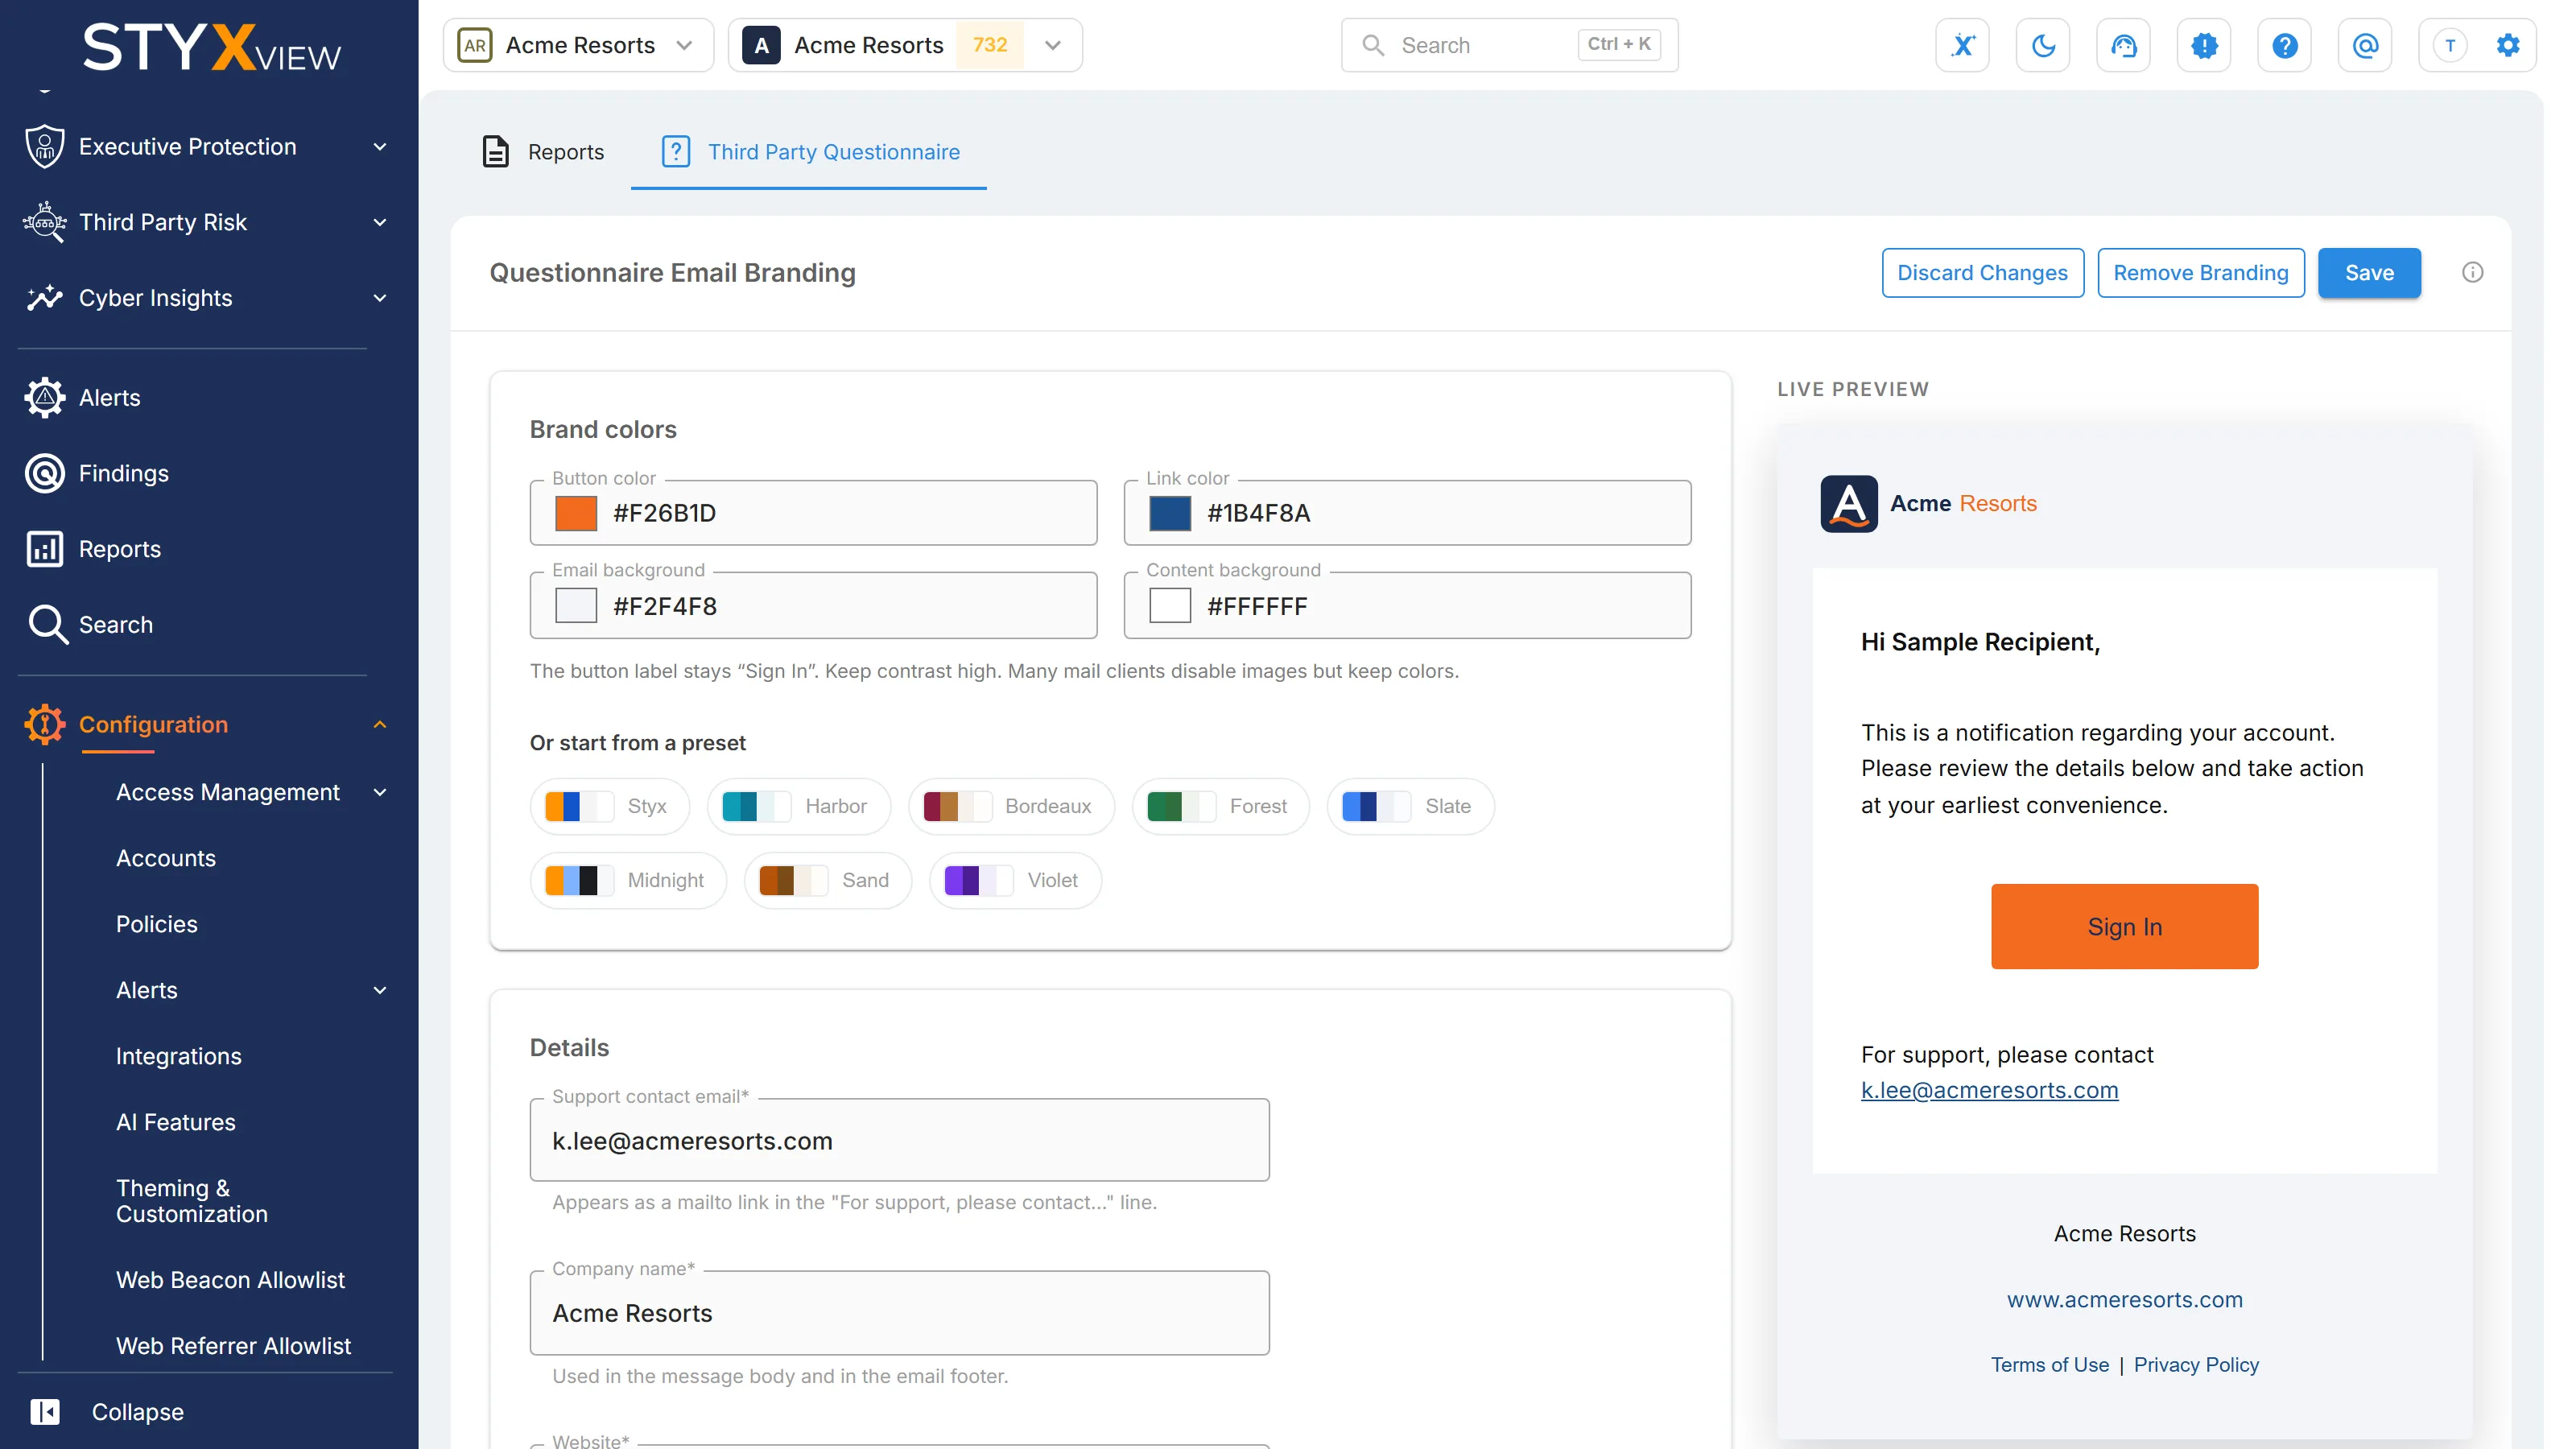
Invitation email branding
Section titled “Invitation email branding”An Admin can brand the email that invites a third party to answer a questionnaire under "Configuration" > "Theming & Customization" > "Third Party Questionnaire": set its colours, details, and logo, and check the result in the live preview. See Theming & Customization.