
Action & Filter Bar
Most tables in StyxView share one toolbar. It lets you choose the columns you see, narrow the rows, act on selected rows, save your setup as a view, and export the data. Some tables show only part of the toolbar: for example, a table you cannot act on has no "Actions" button.

Columns Button
Section titled “Columns Button”- Purpose: choose which columns the table shows.
- How to use: select "Columns" and turn columns on or off.
Filters Button
Section titled “Filters Button”- Purpose: narrow the table to the rows you want.
- How to use: select "Filters", choose a column, an operator such as "contains" or "is any of", and a value. Add more filters to narrow further. On most tables, select "Apply" to update the table.
- The number on the "Filters" button is how many filters are active. Hover over it to see them.
Search Bar
Section titled “Search Bar”- Purpose: find rows that contain a word or value.
- How to use: enter text in "Search..." and press Enter, or select "Search".
Actions Button
Section titled “Actions Button”- Purpose: act on the selected rows, for example to update their status, assign them, or mark them as false positive. The options depend on the table.
- How to use: select rows with their checkboxes, select "Actions", and choose an option.
- You can also right-click a row to open the same options for that row.
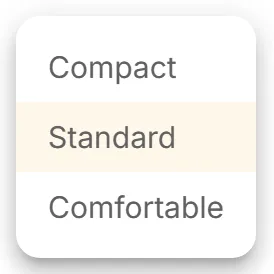
Density Button
Section titled “Density Button”-
Purpose: fit more or fewer rows on the screen.
-
How to use: select the Density icon and choose "Compact", "Standard", or "Comfortable".
View / Bookmark Button
Section titled “View / Bookmark Button”- Purpose: save the current filters, search, sort order, and columns as a view, and load it again later.
- How to use:
- Set up the filters, search, sort order, and columns you want.
- Select the Views icon. The "Views" dialog opens.
- Select "Create View" to save the current setup, or select a saved view and "Load View" to apply it.
- A dot on the Views icon means a saved view is set as your default. Hover over the dot to see its name.
For details, see Saved Views & Bookmarks.
Export Button
Section titled “Export Button”- Purpose: export the table's data.
- How to use: select the Export icon. What happens depends on the table:
- On some tables, such as Findings and Alerts, it opens the "Create Export" dialog, where you export once or on a schedule.
- On other tables, choose "Download as CSV" or "Download as Excel". The file contains every row that matches your search and filters, in the current sort order, with the columns you can see.
For details, see Export Functionality.
Refresh Button
Section titled “Refresh Button”- Purpose: reload the table with the latest data.
- How to use: select the Refresh icon.
Full Screen Button
Section titled “Full Screen Button”- Purpose: give the table the whole screen.
- How to use: select the Full Screen icon. Select it again, or press Esc, to return.